Jewish-style hake with onions and sour cream in a frying pan

A delicious and healthy fish dish for the whole family! To prepare this recipe, you will need a minimum set of products, and the result will exceed all expectations. This is a classic recipe for cooking fish with onions in a frying pan in Jewish style.

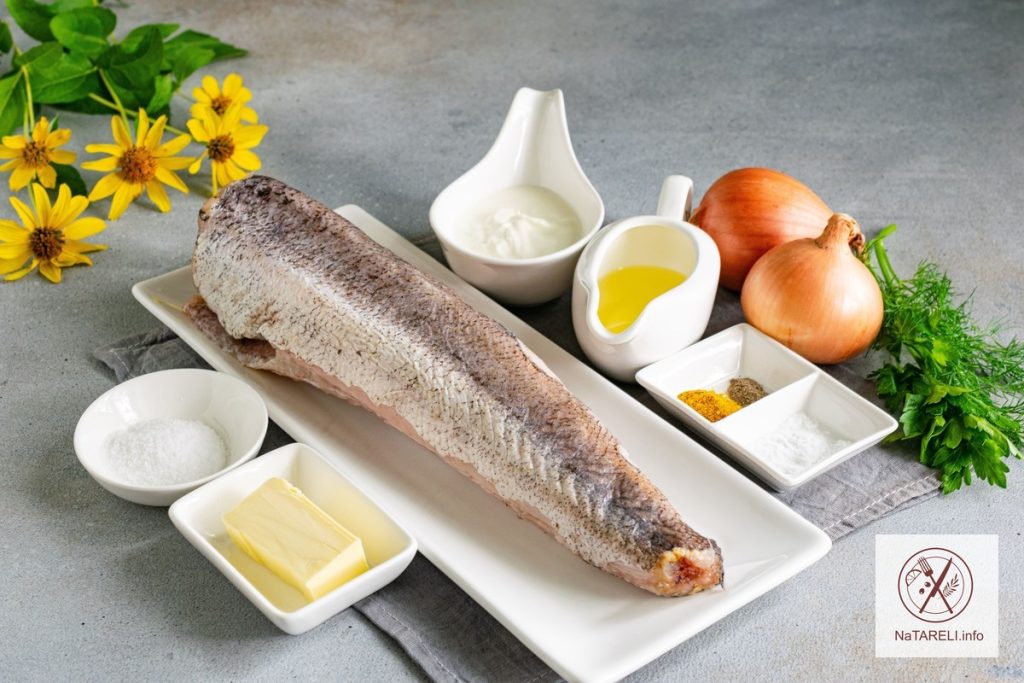
Everything is extremely simple and clear, the main thing is to choose the fish to your taste. I used hake carcass. Any other white fish with a small number of bones will also work: pollock, cod, halibut, sea bass, perch.

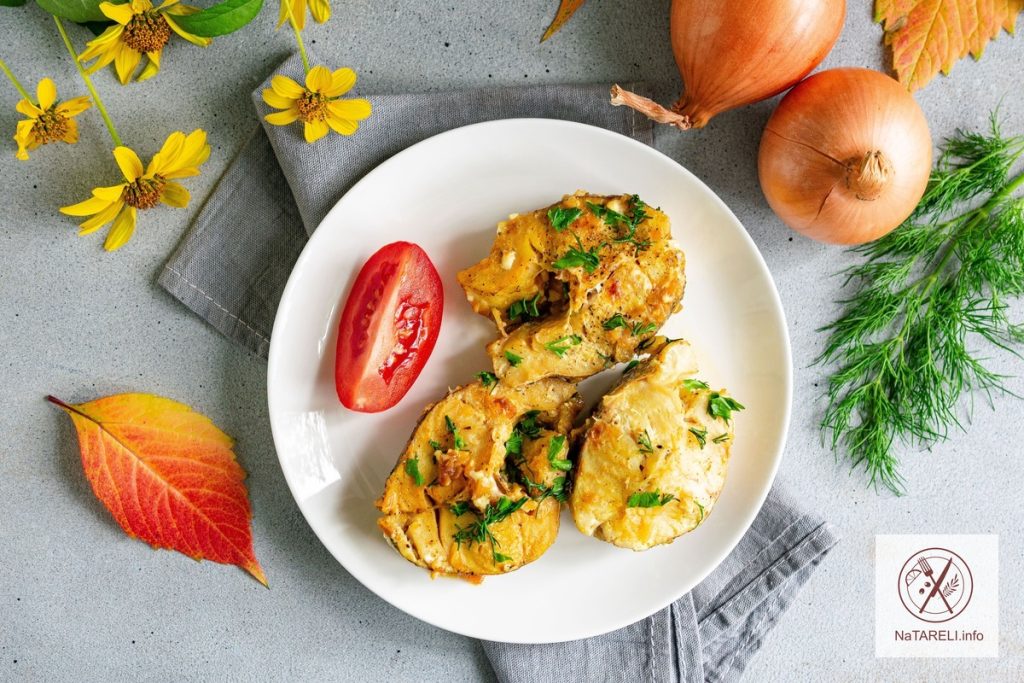
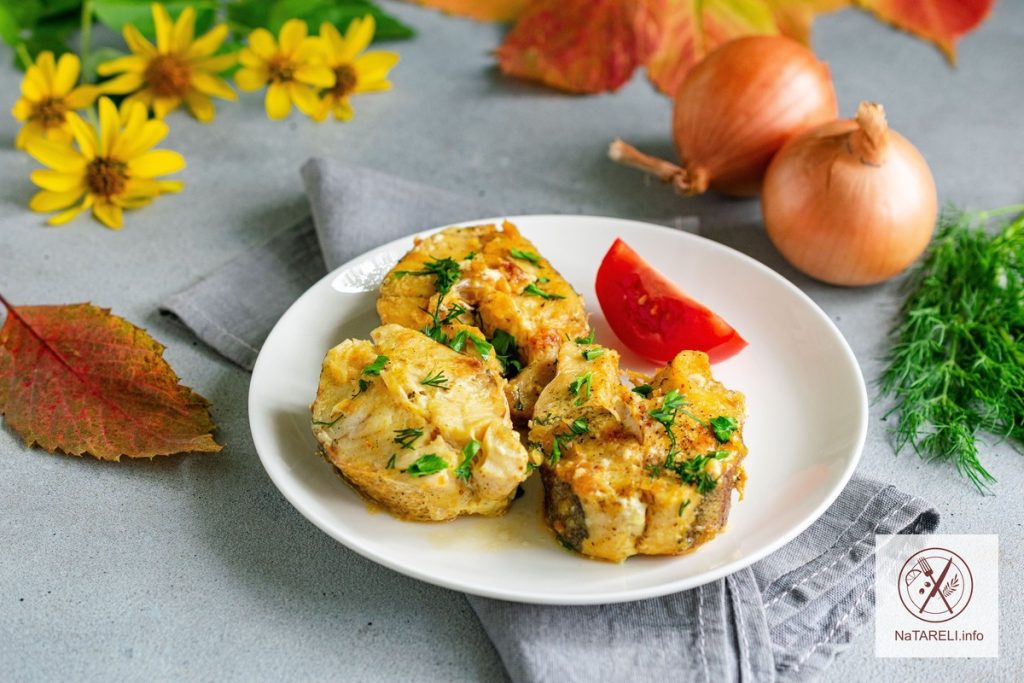
Thanks to the sour cream, the fish turns out juicy and soft, with a delicate creamy taste. Appetizing, golden and aromatic, it will perfectly diversify and complement the home menu. Mashed potatoes are ideal as a side dish. Try it and get real pleasure!

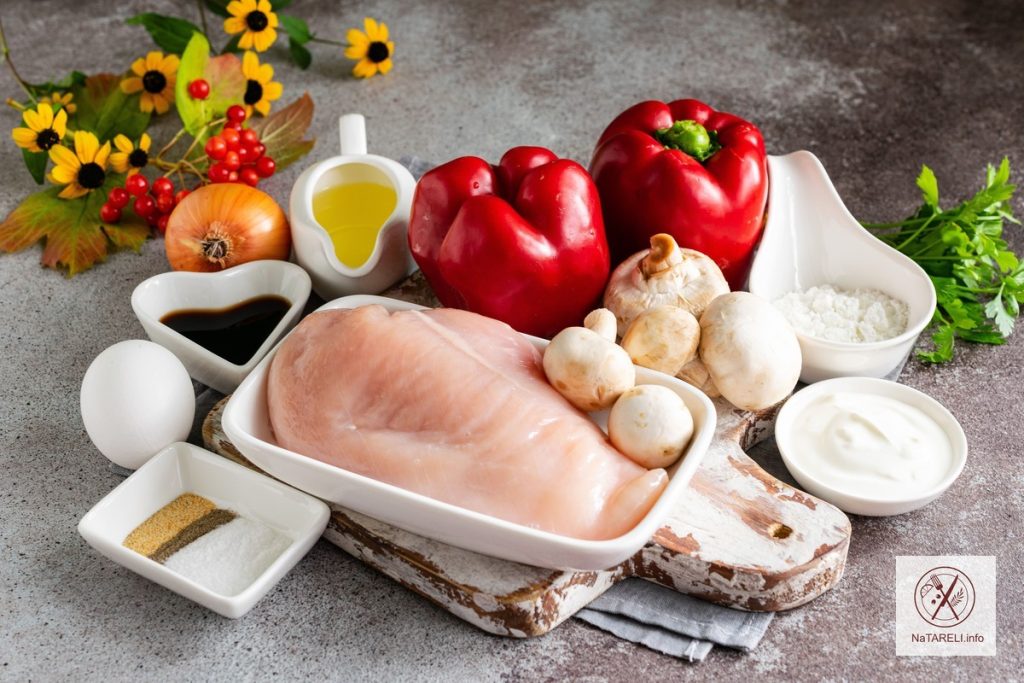
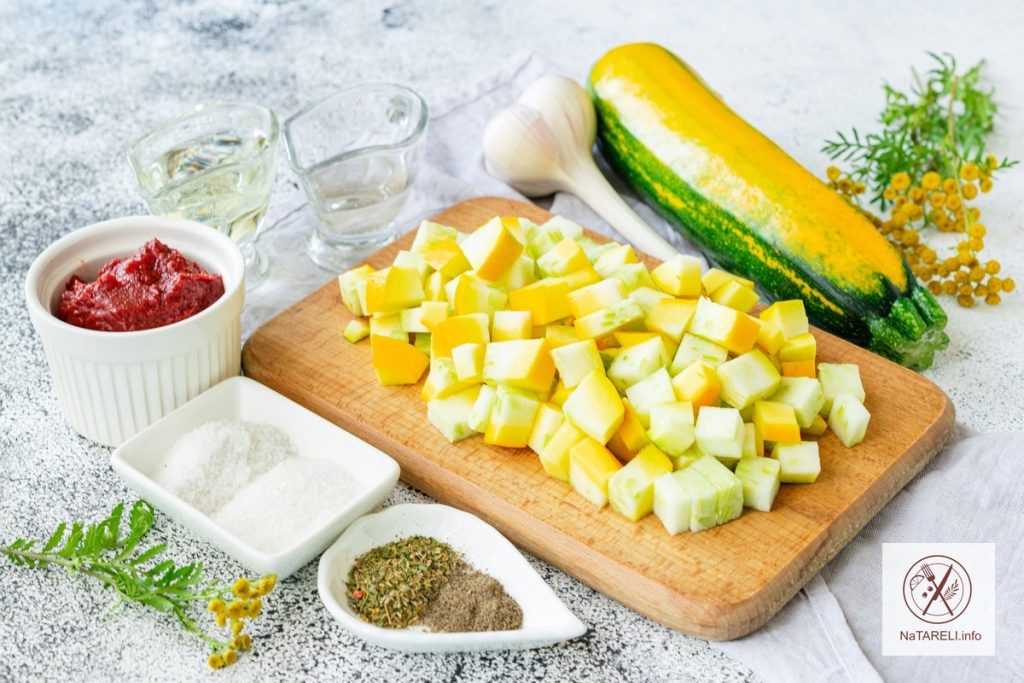
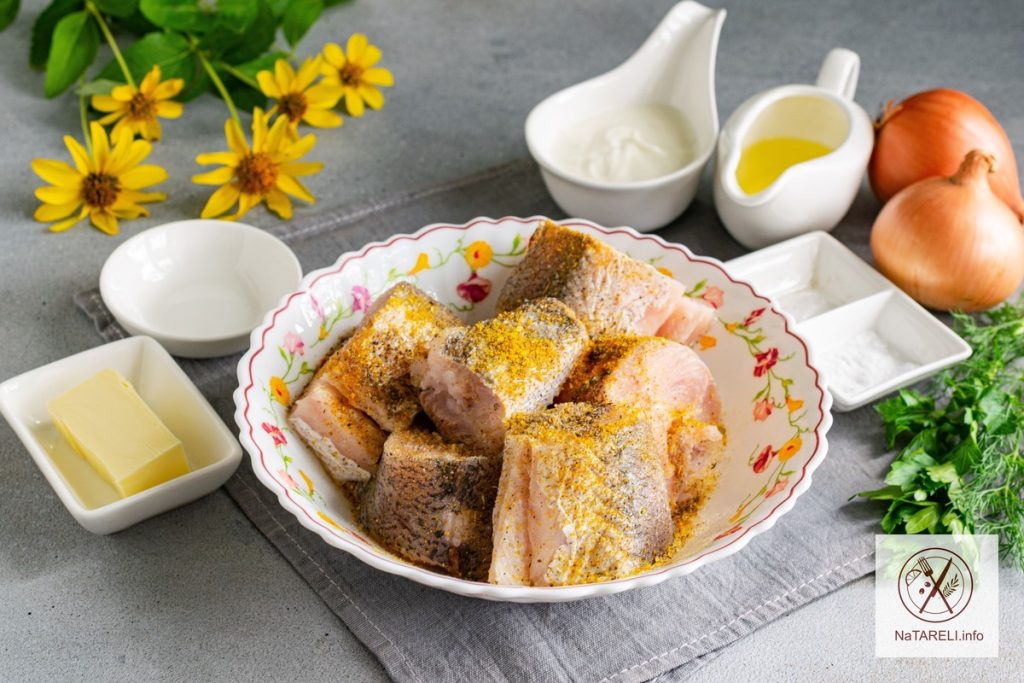
Ingredients for cooking Jewish-style hake with onions and sour cream in a frying pan:

Recipe for Jewish hake with onions and sour cream in a frying pan

Step by step instructions:

1. Defrost the hake carcass in advance on the bottom shelf of the refrigerator or at room temperature. Wash the fish, remove the fins and entrails. Cut the hake into portions and place in a deep bowl.

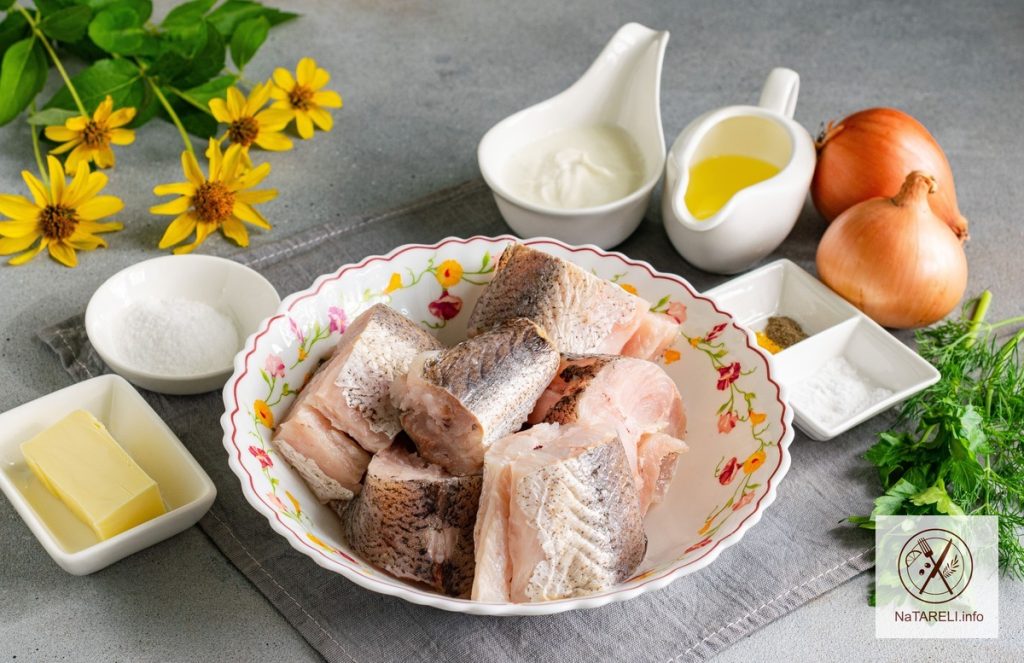
2. Add salt, ground black pepper and fish spices to taste. Mix the ingredients until all the hake pieces are evenly coated with salt and spices. Leave the fish for 20 minutes at room temperature to marinate.

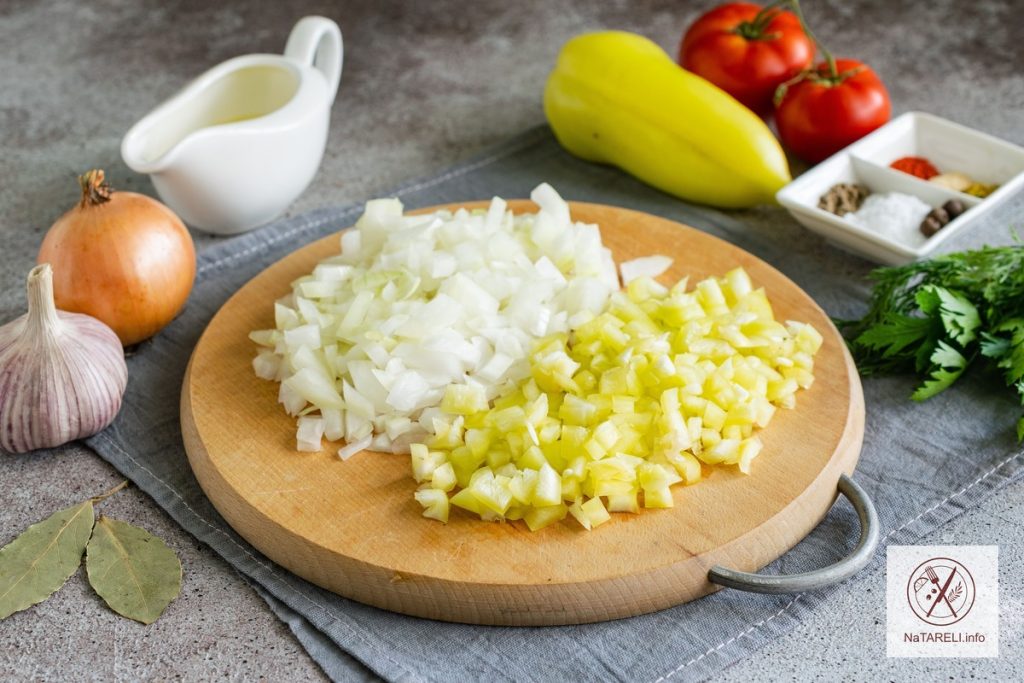
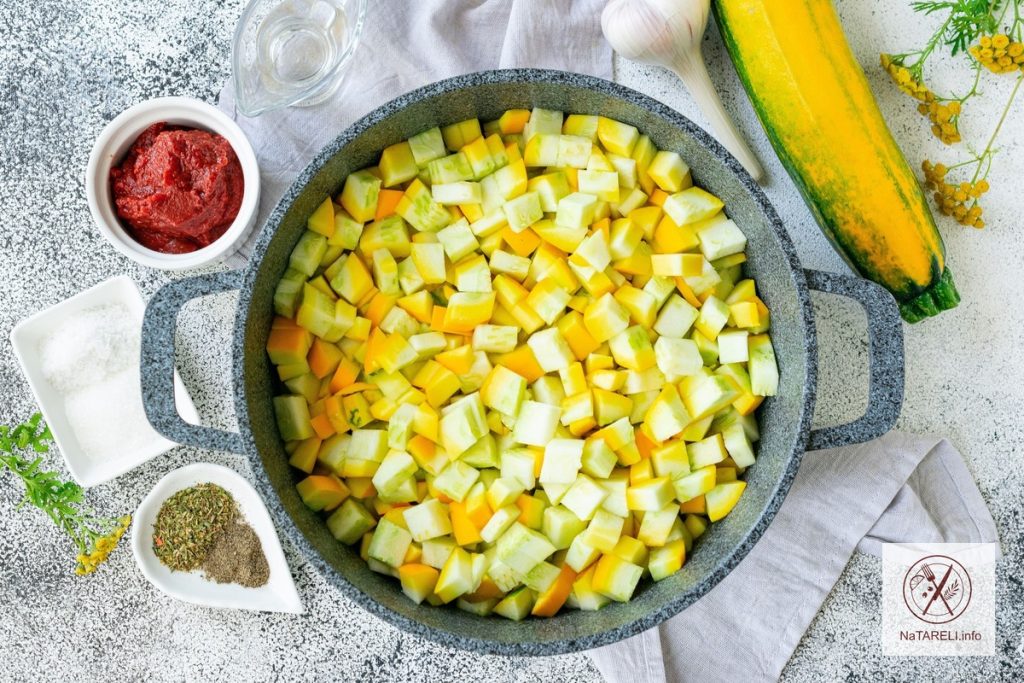
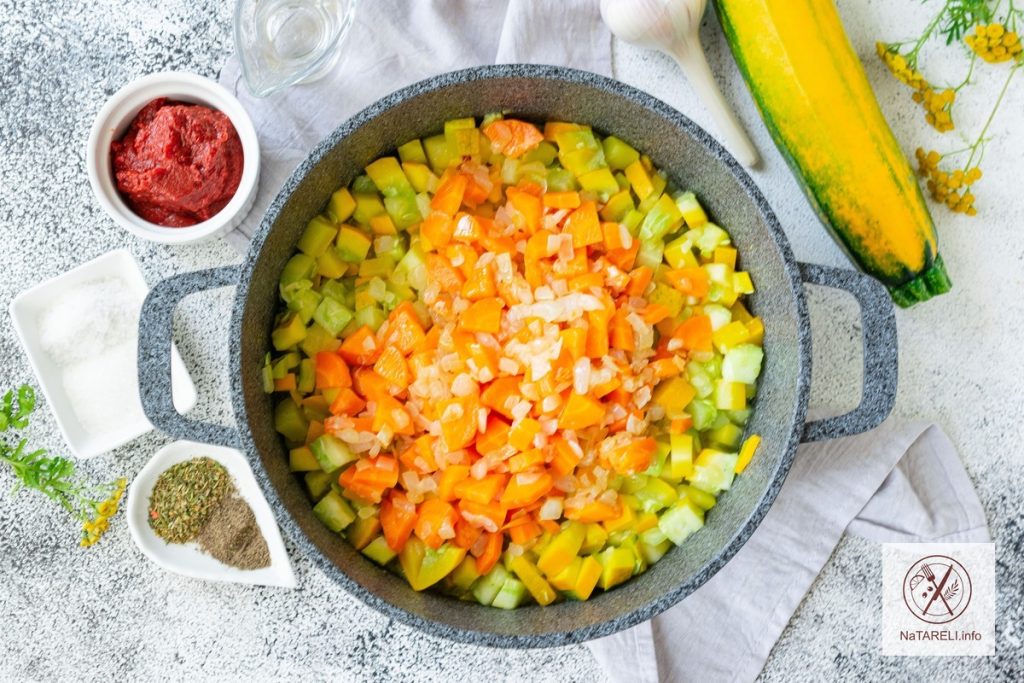
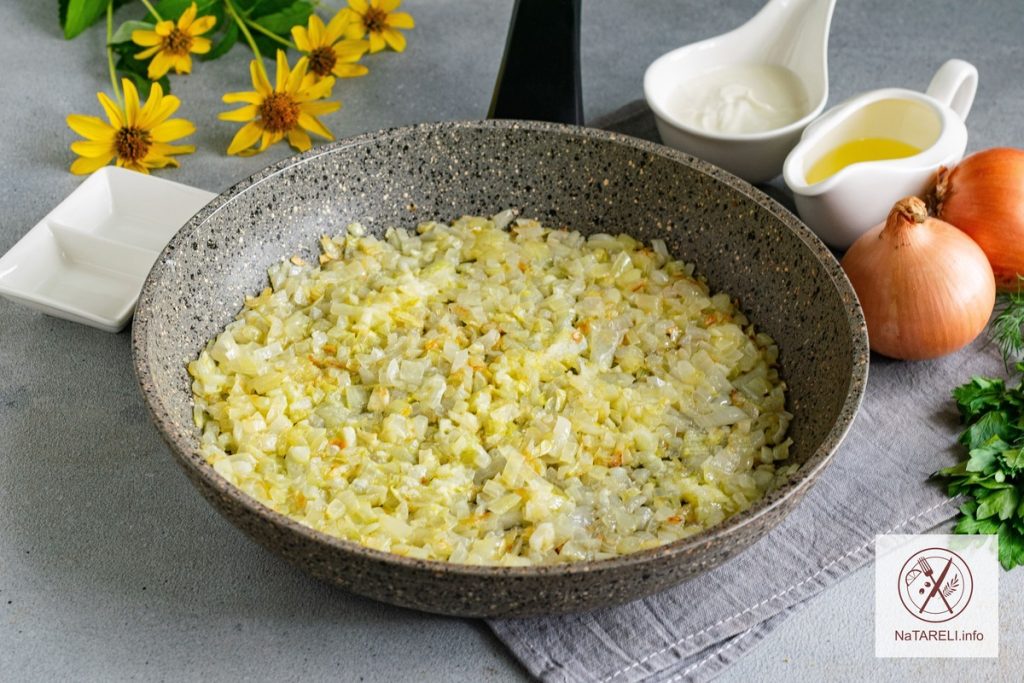
3. Peel the onion and cut into medium-sized cubes. Mix the vegetable oil and butter in a frying pan. Place the chopped onion in the heated mixture. Stirring, fry the vegetables over medium heat until golden brown. Add soda and continue cooking the onion over low heat until soft.

4. When the onion has acquired a puree consistency, place the hake pieces in the frying pan.

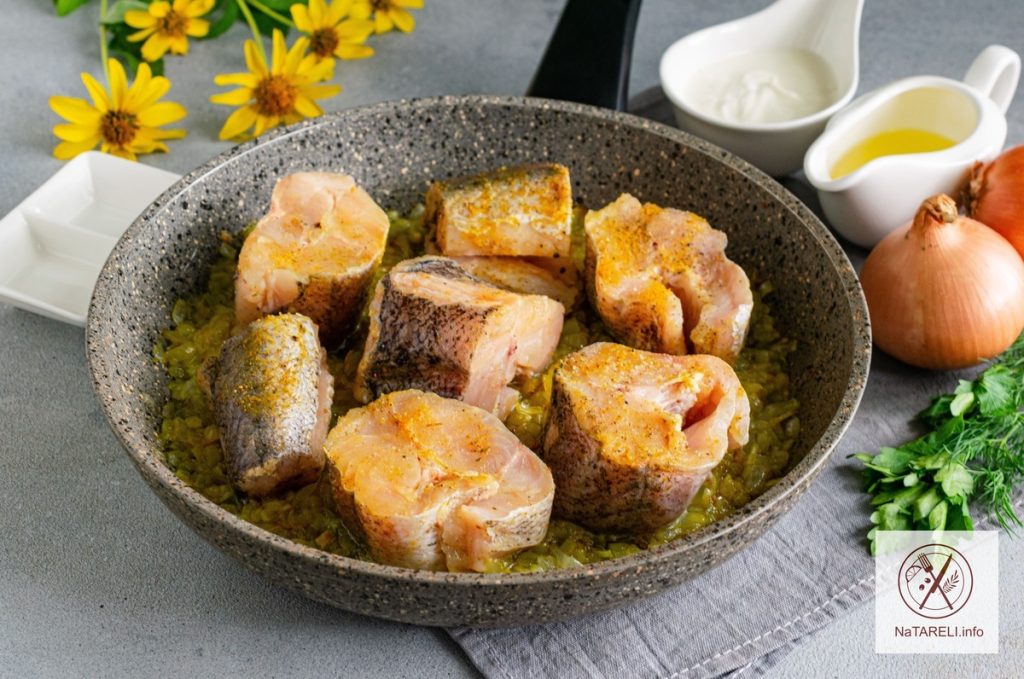
5. Cover the pan with a lid and cook the fish and onion over low heat for 10 minutes. After the specified time, turn the fish pieces over.

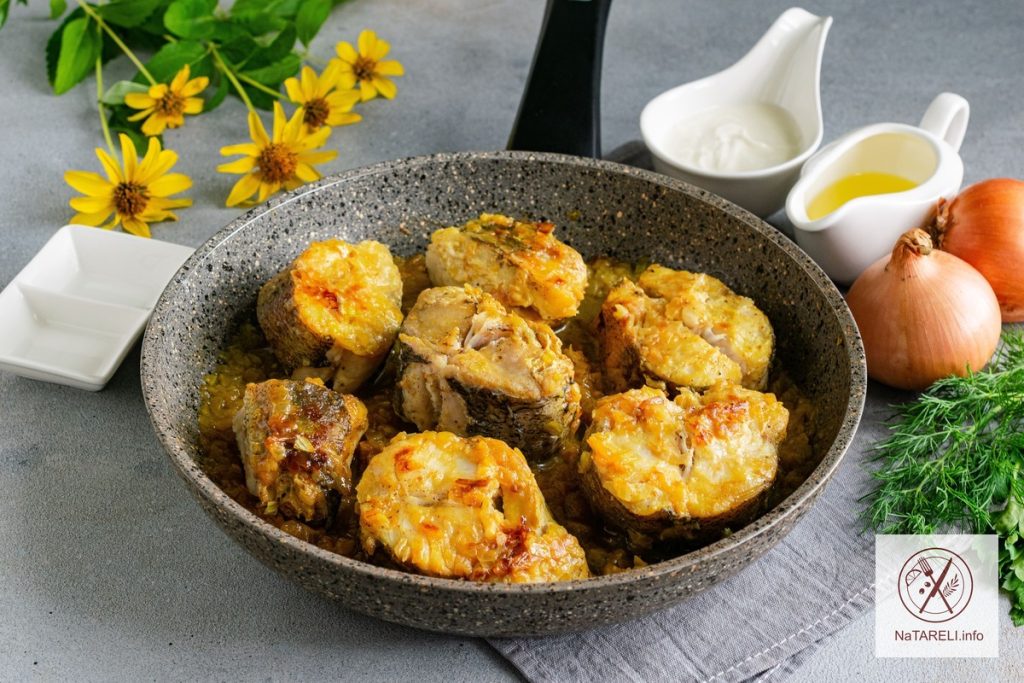
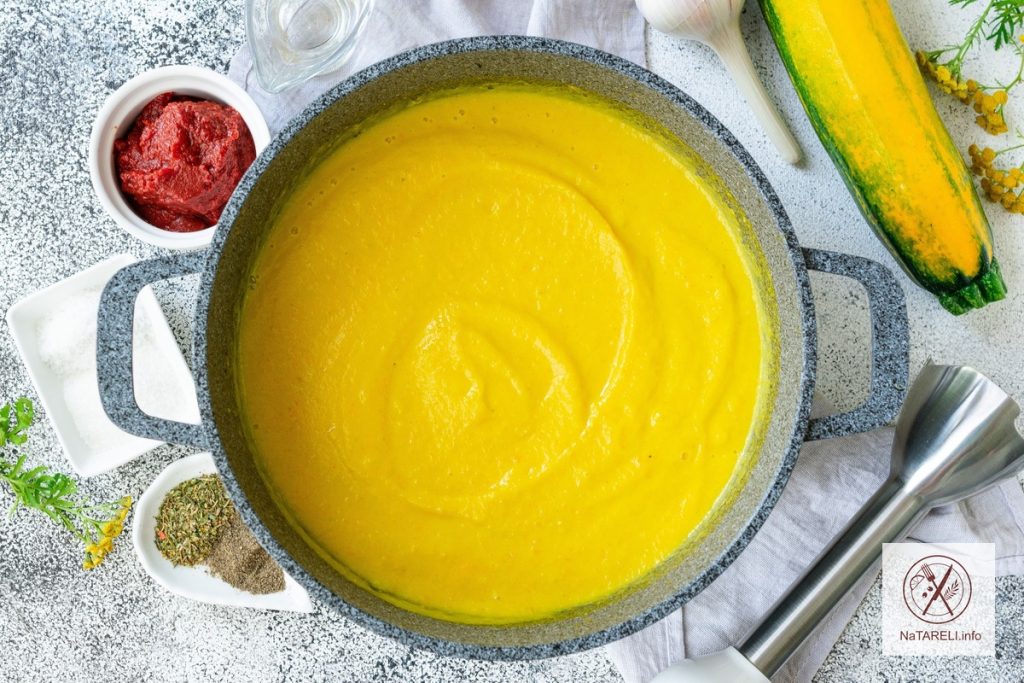
6. Add sour cream, cover the pan with a lid and continue to simmer the dish for another 15 minutes.

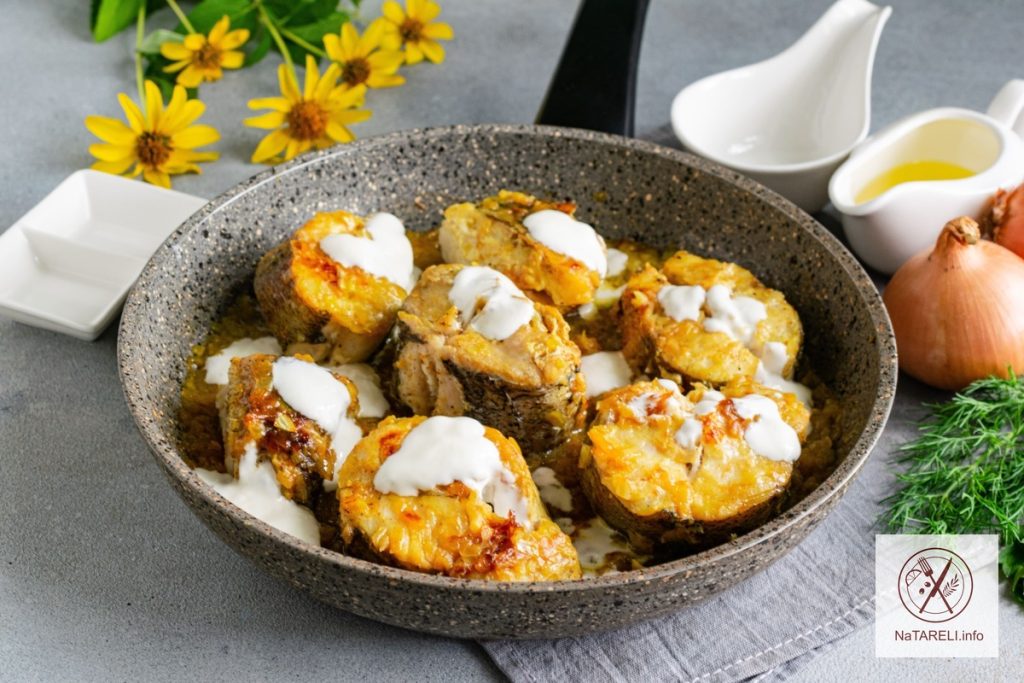
7. Decorate the finished Jewish-style fish with dill and parsley and serve with a side dish of potatoes.
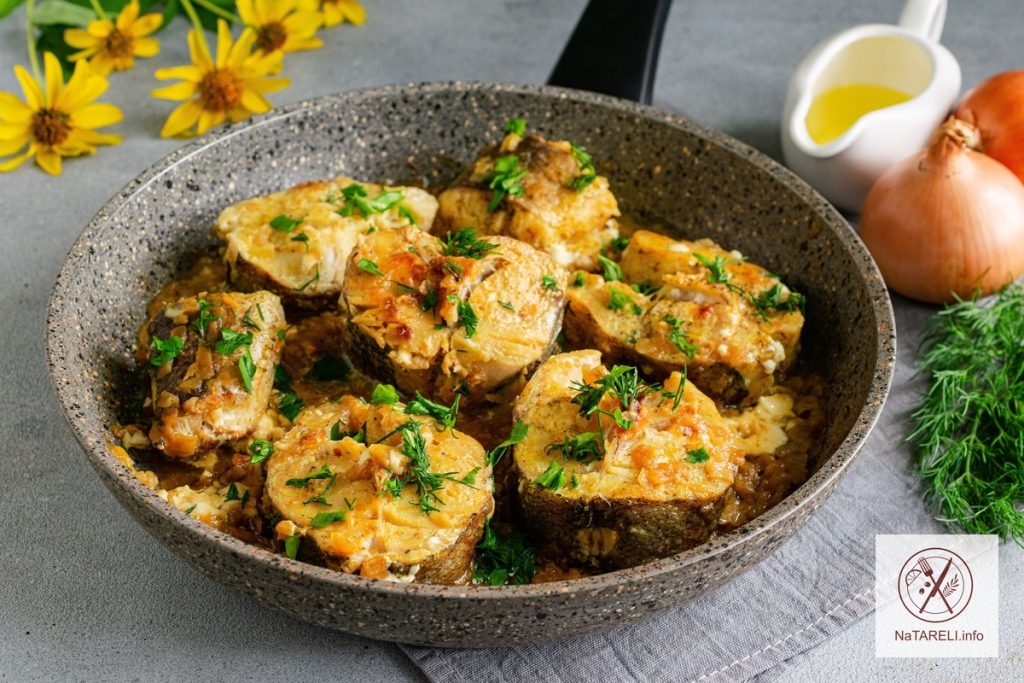
Bon appetit!

You may also like:

Hake cutlets with semolina and butter


Eggplant appetizer with sweet pepper and garlic

Eggplant appetizer with sweet pepper, garlic and greens is very tasty and aromatic. In the process of pickling, vegetables acquire a piquant sweet-sour note, giving the dish a special original taste.

Eggplants for the recipe will be fried in several stages, since the vegetables must be laid out in a pan in one layer so that they are fried, and not stewed in their own juice. A mixture of bell pepper, garlic and greens must be laid out in layers on the still hot eggplants. Thanks to this, the sweet pepper releases its juice, and the garlic and parsley reveal their aroma better.

The snack turns out to be incredibly tasty, very aromatic and juicy. It is perfect with meat, chicken or potato side dish. If you like spicy, add finely chopped chili peppers, cleaned of seeds, to the snack.

Ingredients for making an eggplant snack with sweet pepper and garlic:

Eggplant appetizer recipe with sweet pepper and garlic

Step-by-step instructions:

1. Wash the eggplants, cut off the tails. Peel the vegetables, cut them into strips.

2. Wash the sweet pepper, cut it in half, remove the core and seeds. Cut the vegetables into thin strips.

3. Wash parsley and dill greens, dry them from excess moisture, and finely chop them. Peel the garlic cloves.

4. In a deep dish, mix crushed sweet pepper, finely chopped greens and cloves of garlic passed through a press. Mix the ingredients.

5. Place the eggplants cut into strips in a single layer on a pan with heated oil. While stirring, fry the vegetables over medium heat until golden.

6. Transfer the eggplants to a deep salad bowl, add salt and ground black pepper to taste. Fry the next batch of vegetables.

7. Spread a portion of the vegetable mixture of sweet pepper, garlic, and greens on the hot eggplants.

8. Alternate layers, put all the vegetables in a salad bowl.

9. Prepare the marinade for the salad. Mix apple cider vinegar and sugar in a ladle. Stirring, bring the mixture to a boil.

10. Pour the hot marinade over the eggplant snack. Leave it for 30 minutes at room temperature, then cover the salad bowl with a lid or cling film and put it in the refrigerator.

11. After 4 hours, the snack will be marinated and ready to eat. A delicious cold appetizer will perfectly complement juicy shish kebab, baked chicken or steamed cutlets.

Bon appetit!

Try to cook:

Eggplants baked with tomatoes, boiled sausage and hard cheese in the oven

Chicken stew with eggplant and pepper


Salad with crab sticks, fried mushrooms and rice

When you’re tired of the classic salad with crab sticks, try cooking it with fried mushrooms. It is best if it is champignons. They have a neutral taste and go well with the rest of the ingredients.

The salad can be formed in layers, or you can simply mix all the ingredients in a deep bowl. The combination of crab sticks and fried mushrooms is very reminiscent of the taste of boiled squid, so you get the impression that the salad is made with squid. Try it too!

Use quality crab sticks from a proven manufacturer. The taste of the whole dish will depend on them. It is quite quick to prepare the salad, the main thing is to wait for the rice and mushrooms to cool down. It is important that all the ingredients are at room temperature, otherwise the dish can spoil quickly.

Ingredients for making a salad with crab sticks, fried mushrooms and rice:

Recipe for salad with crab sticks, fried mushrooms and rice

Step-by-step instructions:

1. Wash the rice thoroughly under running water, pour it into a ladle, pour 500 ml of cold water. Add salt to taste, boil the groats until ready over low heat. Throw the finished rice on a sieve, cool to room temperature.

2. Peel the onion and cut it into small cubes. Put the vegetables in a pan with heated oil. While stirring, saute the onion over medium heat until a light golden hue.

3. Wash fresh mushrooms, cut into medium-sized cubes. Add mushrooms to onions. We mix the ingredients, continue to fry them together until the mushrooms are ready.

4. At the end of cooking, add salt and ground black pepper to taste. Cool the mushrooms and onions to room temperature.

5. Mix the boiled rice with a small amount of mayonnaise, spread it in an even layer in a salad bowl or a culinary ring set on a flat serving plate.

6. Remove the crab sticks from the packaging, cut them into small cubes, put them on the rice. Apply a mesh of mayonnaise on top.

7. Grind the hard cheese on a grater into large shavings, distribute evenly over the crab sticks. Spread the salad layer with mayonnaise.

8. Spread fried mushrooms with onions on top. Apply a mesh of mayonnaise.

9. Hard-boil the chicken eggs, cool them in cold water, and peel them. Separate the proteins from the yolks. Grind the egg whites on a large grater, put them in a cooking ring. Add salt to taste, grease the layer with a small amount of sauce.

10. Grind the chicken yolks on a fine grater, put them in the salad as the last layer. It is not necessary to add mayonnaise on top.

11. Cover the salad with cling film, put it in the refrigerator for 1 hour. Carefully remove the cooking ring and serve the salad, garnishing it with dill.

Bon appetit!

Try to cook:

Salad “Mushroom Basket”

Korean salad with crab sticks and carrots


Lavash envelopes with apples in a frying pan

The easiest way to prepare a delicious treat for tea is to use thin lavash as a base. And for the filling, take whatever your heart desires. Today I suggest using apples with lemon zest and cinnamon for the filling. Wrap the lavash into an envelope and fry until golden brown in a frying pan.

Apples perfectly complement the unleavened dough of lavash, so the envelopes turn out very tasty and aromatic. This simple dish is perfect for a snack or home tea party. It is better to take juicy apples with a slight sourness.

The specified amount of ingredients makes 8 envelopes.

Ingredients for making lavash envelopes with apples in a pan:

Recipe for making lavash envelopes with apples in a pan

Step-by-step instructions:

1. Prepare the filling. Remove the zest from the lemon and squeeze out the juice from half. Wash the apples, peel them, remove the core and seeds. Grind the fruit on a coarse grater, add the juice of half a lemon, mix. Put the apples in a frying pan with melted butter. Add the lemon zest, sugar and ground cinnamon.

2. Stirring, simmer the filling over medium heat for 5 minutes. Cool the apples to room temperature.

3. Cut the pita bread into 15×15 cm squares.

4. Put 1 tablespoon of apple filling on one edge of the pita bread.

5. Wrap the blank into an envelope, as in the photo.

6. Form all the products in this way.

7. Beat the egg with a fork in a deep bowl until the white and yolk combine. Grind the peanuts into large crumbs using a blender. Dip the apple envelopes in the beaten egg, roll in peanuts.

8. Place the envelopes in a frying pan with heated vegetable oil.

9. Fry the products over medium heat until golden brown on both sides.

10. Place the finished envelopes on a paper towel to remove excess oil. Serve the lavash envelopes with apples and lemon zest warm with tea or coffee.

Bon appetit!

You may like:

Kefir pie with cherries in a multicooker

Pie with cottage cheese and pear


Fried Eggplant Soup with Chicken Broth

You can make many delicious and healthy dishes from eggplant. These can be salads, casseroles, stews or snack rolls – it all depends on your imagination. In the season, when vegetables can be found in abundance, you want to use eggplants to the maximum, adding them to various dishes.

Therefore, today I suggest making a fragrant soup with fried eggplants in chicken broth. The undoubted advantage of this recipe is the ease of preparation, as well as the large number of vitamins contained in vegetables, which are perfectly preserved during cooking.

An original and very tasty soup with fried eggplants for the whole family will delight you with its novelty and rich composition of products.

Ingredients for making fried eggplant soup with chicken broth:

Recipe for making fried eggplant soup with chicken broth

Step-by-step instructions:

1. Wash the chicken drumsticks, put them in a saucepan, pour in 2 liters of cold purified water. Cover the pan with a lid and place it on medium heat. When the broth starts to boil, carefully remove the foam with a slotted spoon and reduce the heat to low. Cook the chicken broth for 40 minutes, then remove the cooked meat from the pan.

2. Wash the potatoes, peel them, and cut them into small cubes.

3. Put the chopped potatoes into the finished chicken broth. Cover the pan with a lid and cook the soup over low heat.

4. Peel the onion and cut it into small cubes. Wash the bell pepper, remove the seeds, and chop it finely.

5. When the potatoes are half-cooked, add the chopped onion to the soup.

6. Then add the bell pepper to the pan.

7. Wash the eggplant, peel it, cut it into 5-7 mm thick pieces. Bread the vegetables in wheat flour, put them in a frying pan with heated olive oil.

8. Fry the eggplants over medium heat until golden brown on both sides.

9. Cool the eggplants to room temperature and cut them into medium-sized cubes.

10. Add the fried eggplants to the pan with the soup, stir. Continue cooking the soup over low heat until the vegetables are ready.

11. Wash the fresh tomatoes, cut them into medium-sized pieces. If desired, you can peel the tomatoes beforehand. Wash the dill and parsley, chop finely.

12. Add the chopped tomatoes to the soup.

13. Add finely chopped herbs, salt, ground spices, bay leaves and black allspice. For flavor, add a clove of garlic passed through a press.

14. Let the soup boil again, then turn off the heat. Pour the finished dish into portioned plates or soup bowls and serve with slices of fresh baguette.

Bon appetit!

You may also like:

Creamy zucchini soup with chicken broth

Soup with canned fish and rice


Pickled tomatoes with dry mustard in 4 days

Today we will prepare delicious pickled tomatoes according to an original recipe. During the pickling process, lactic acid is formed, which has a preservative effect on the products, giving the tomatoes a special taste and aroma. As a result, we get aromatic and moderately salty tomatoes with a pleasant sourness, which is perfect as an appetizer for meat dishes, baked poultry or sausages. Mustard prevents mold from forming on the surface of the brine and gives the vegetables a piquant note.

You can use any variety of tomatoes for the recipe. The main thing is that the fruits are ripe and the same size, then they will cook at the same time. I used plum tomatoes, they are fleshy and well suited for pickling. Be sure to try to repeat this recipe to enjoy the most delicious summer treat with your family. A piquant marinade with spices gives vegetables an amazing taste and aroma!

Ingredients for making pickled tomatoes with dry mustard in 4 days:

Recipe for making pickled tomatoes with dry mustard in 4 days

Step-by-step instructions:

1. Put horseradish, bay leaf and black currant leaves, sprigs of fresh herbs, and dill umbrellas on the bottom of a clean three-liter jar. Add peeled garlic cloves for flavor and a few rings of hot pepper, cleared of seeds.

2. Wash the tomatoes, use a toothpick to pierce the skin around the stalk in several places. Fill the jar with prepared vegetables.

3. I alternated tomatoes with herbs and garlic so that the snack looked appetizing in the jar.

4. In a ladle or small saucepan, mix table rock salt, sugar and mustard powder. For flavor, add black allspice, a mixture of peppercorns, coriander grains and a few clove buds. Pour 1.5 liters of purified cold water over the ingredients. Stirring until the dry ingredients are completely dissolved, bring the marinade to a boil.

5. Pour boiling marinade over the vegetables in the jar. The liquid should completely cover all the ingredients.

6. Tie the jar with vegetables with gauze or a clean cloth. Leave the tomatoes at room temperature for 4 days.

7. After the specified time, the pickled tomatoes with mustard will be ready. The marinade will become slightly cloudy during the pickling process, this is normal. Close the jar with a nylon lid and put it in the refrigerator for storage.

Bon appetit!

Try to cook:

Eggplants baked with tomatoes, boiled sausage and hard cheese in the oven


Chopped chicken cutlets with champignons, fried in bell pepper rings

I suggest making original chicken cutlets, according to this recipe they turn out very juicy and tasty. Vegetables and champignons give the chopped cutlets an amazing aroma. To make the dish perfect, we will use bell peppers with thick fleshy walls.

Such an appetizing and bright dish will help diversify the everyday menu and is perfect for a festive table. Both adults and children will appreciate it. Serve chopped cutlets with your favorite side dish of vegetables, cereals or pasta – they go well with all products.

If you want to make a new interesting dish from chicken fillet, be sure to try repeating this recipe. It is simple, quite fast, very tasty and unusual!

Ingredients for cooking chopped chicken cutlets with champignons, fried in bell pepper rings:

Recipe for making chopped chicken cutlets with champignons, fried in bell pepper rings

Step-by-step instructions:

1. Wash the bell pepper, cut into 1.5 cm thick rings. Remove the core with seeds.

2. Wash the chicken fillet, dry off excess moisture with paper towels. Clean the meat from fat and films, cut into small cubes. Transfer the chopped chicken fillet to a deep bowl.

3. Wash fresh champignons, if necessary, clean the mushroom caps, cut off the darkened base of the legs. Cut the champignons into small cubes, add to the chicken fillet.

4. Peel the onion, cut into small cubes, add to the minced chicken and mushrooms.

5. Cut the remaining pieces of bell pepper into small cubes and add to the other ingredients.

6. Beat 1 chicken egg into the minced meat, pour in soy sauce, add full-fat sour cream.

7. Add corn starch, salt and spices to taste to the resulting mixture.

8. Mix the mince for the cutlets thoroughly until smooth.

9. Place the bell pepper circles in a frying pan with heated vegetable oil. Place a small amount of mince inside each vegetable circle. Press it with a spoon so that the mince fits tightly to the walls of the bell pepper.

10. Fry the products under the lid over medium heat until golden brown on both sides. Place the finished chicken cutlets on a plate covered with paper napkins to remove excess oil.

11. Serve these delicious chopped cutlets in bell pepper rings hot as a main dish. You can also serve your favorite side dish, fresh salad, sour cream sauce with herbs or ketchup.

Bon appetit!

Try cooking:

Chicken cutlets with vegetables and rice, baked in the oven


Eggplants baked with tomatoes, boiled sausage and hard cheese in the oven

You can make many delicious and healthy recipes from eggplants. Today I suggest making a delicious hot appetizer from them, which is perfect for both an everyday dinner and a festive table.

Eggplant slices baked in the oven with tomatoes, boiled sausage and hard cheese turn out very tasty, juicy and aromatic. Appetizing appearance, unique taste and portioned serving make this appetizer very popular among guests.

If desired, boiled sausage can be replaced with boiled or smoked chicken fillet, it will turn out no less tasty and healthy.

Ingredients for cooking eggplants baked with tomatoes, cooked sausage and hard cheese in the oven:

Recipe for cooking eggplants baked with tomatoes, boiled sausage and hard cheese in the oven

Step-by-step instructions:

1. Wash the eggplants, cut off the ends, cut the vegetables into 1 cm thick circles. Transfer the eggplant circles to a deep bowl. Fill the vegetables with cold water and leave for 20 minutes to remove excess bitterness.

2. Dry the eggplant circles on paper towels. Place the vegetables on a baking sheet covered with silicone parchment paper.

3. Salt the eggplants to taste, season with black ground pepper.

4. Wash fresh tomatoes, cut into 5 mm thick circles. Place tomato circles on each eggplant slice.

5. Sprinkle the vegetables with dried garlic and smoked paprika for flavor.

6. Grease the vegetables with a small amount of mayonnaise. If desired, the sauce can be replaced with thick sour cream or natural yogurt.

7. Peel the cooked sausage and grate it on a fine grater. Spread the grated sausage evenly over the vegetables.

8. Grate the hard cheese into small shavings. Place the grated cheese on top of the sausage.

9. Place the eggplants with tomatoes, cooked sausage and hard cheese in an oven preheated to 180 degrees for 25-30 minutes. During this time, the eggplants will be completely baked and become soft, and the hard cheese will melt and brown.

10. Serve the finished appetizer hot, garnished with fresh dill. Bon appetit!

You may also like:

Chicken stew with eggplant and pepper


Zucchini caviar for the winter without sterilization

A delicious, tender, low-calorie preparation for the whole family. Zucchini caviar with carrots, onions and tomato paste for the winter is a godsend for caring housewives who will not miss the chance to stock up on homemade pickles during the vegetable season.

The preserves turn out very tasty and appetizing. The delicate texture, unique aroma and piquant taste make this preparation the most popular in the family menu. Zucchini caviar for the winter according to this recipe is moderately spicy, the amount of ground black pepper can be adjusted to taste. During the cooking process, the caviar does not necessarily have to be pureed with a blender, in the form of pieces it is no less tasty and tender.

The finished preserves are perfectly stored throughout the winter without losing their taste. If you are using large ripe zucchini, peel them first and remove the core with seeds.

Ingredients for making zucchini caviar for the winter without sterilization:

Recipe for making zucchini caviar for the winter without sterilization

Step-by-step instructions:

1. Peel the onion, cut into medium-sized cubes.

2. Place the chopped vegetables in a deep saucepan with heated vegetable oil. Stir occasionally and sauté the onion over medium heat until lightly golden.

3. Wash the carrots, peel them, and cut into quarter rings.

4. Add the chopped carrots to the onions. Mix and continue frying the ingredients together for 3-4 minutes. Using a slotted spoon, remove the sautéed vegetables from the pan and transfer them to a separate bowl.

5. Wash the zucchini, cut off the ends, and peel the vegetables if necessary. Cut the zucchini into medium-sized cubes.

6. Place the chopped zucchini in the pan in which the vegetables were sautéed. Add a little more vegetable oil if necessary. Stir occasionally and fry the zucchini over medium heat without a lid for 10 minutes.

7. Add the sautéed vegetables to the fried zucchini and stir. Cover the pan with a lid and simmer the vegetables over low heat for 15 minutes. During this time, the zucchini will release juice, and all the vegetables will simmer in the liquid. If there is not enough vegetable juice, add a little hot water to the pan.

8. After the specified time, the vegetables will become soft and fully cooked. Grind the contents of the pan with an immersion blender into a homogeneous thick puree. If desired, you can skip this step.

9. Add tomato paste, sugar, salt and spices to taste to the zucchini caviar. Stir, continue simmering the zucchini caviar under a lid over low heat for another 15 minutes.

10. Add the garlic cloves passed through a press and 9% vinegar to the zucchini caviar 5 minutes before the end of cooking. Stir.

11. Let’s taste the finished squash caviar. If necessary, add a little more sugar, salt or ground black pepper. Transfer the boiling squash caviar into sterilized glass jars.

12. Screw the jars with sterilized lids or roll them up using a machine. Turn the jars with the preparations upside down, wrap them in a blanket and leave for one day until completely cooled. Store the finished squash caviar in a cool, dark place. The specified amount of ingredients makes 1 liter of squash caviar.

Bon appetit!

Try cooking:

Creamy zucchini soup with chicken broth

Potato pancakes with zucchini


Broccoli salad with hard cheese and corn

From a minimal set of products, very healthy and tasty! Broccoli salad with hard cheese and corn is a great option for a light dinner. The salad turns out to be quite filling, but not too high in calories and very tasty. It is prepared quickly and easily, it can be served for a holiday or every day.

Broccoli and corn are the perfect combination! We will add nutrition due to chicken eggs and hard cheese, garlic and fresh herbs will not be superfluous. For dressing, you can use sour cream or natural yogurt, they are less caloric.

For the recipe, you can use frozen broccoli florets, so this salad will please you at any time of the year. Minimum calories, maximum taste and bright colors!

Ingredients for making broccoli salad with hard cheese and corn:

Recipe for making broccoli salad with hard cheese and corn

Step-by-step instructions:

1. Wash broccoli, separate into small florets, put in a ladle with boiling water. Blanch the cabbage for 5 minutes, then place it in a sieve and plunge it into ice water to stop the cooking process and preserve the beautiful green color of the vegetables.

2. Boil the chicken eggs hard, cool them in cold water, peel them, and cut them into small cubes. Grind the hard cheese in the same way and add it to the salad bowl with the boiled eggs.

3. Add the blanched broccoli to the salad.

4. Pour the canned corn, strained from the marinade, into the salad. Wash the dill, dry it from excess moisture, chop it finely and add it to the other ingredients.

5. For the salad dressing, mix mayonnaise, mustard seeds, and a clove of garlic passed through a press. Mix the ingredients until smooth.

6. Add the prepared dressing to the salad. Salt the dish to taste, season with ground black pepper.

7. Gently mix the broccoli salad with hard cheese and corn so that all the ingredients are combined.

8. The delicious and healthy broccoli salad is ready. It can be served immediately after preparation or pre-cooled in the refrigerator for 30 minutes.

Bon appetit!

Try cooking:

Salad with radish, apple and hard cheese

Salad “Mushroom Basket”